
Qml응용프로그램을 작성하기 위해서는 QtQuick 모듈 및 Qml언어를 사용 방법을 알아야한다. QtQuick 모듈은 Qml응용프로그램을 작성하기위한 표준 라이브러리이다.
QtQuick 모듈은 Qml을 사용하여 UI를 만드는 데 필요한 모든 기본 타입들을 제공한다.
QtQuick 모듈 Import
QtQuick 모듈을 사용하려면 Qml문서에서 import문을 사용하면된다. 가져오기 구문은 다음과 같다.
import QtQuick 2.11 // 설치된 Qt버전에 따라 알맞는 버전을 명시한다.
이제 QtQuick이 제공하는 기본 유형과 기능을 Qml문서에서 사용할 수 있다.
Window
사용자와 GUI응용프로그램간 상호작용을 하기위해 화면을 통해 뭔가를 제공하고 입력을 받아 처리하는 적절한 작업이 필요한데, Qml로 어떤 UI요소를 작성하고 화면에 보여주기 위해선 가장 먼저 window를 생성해야한다.
Qml의 기본검포넌트에 Window가 있는데 이 윈도우객체에 화면요소를 배치하고 입력을 받아 처리하는 부분을 구현해주면되는 것이다.
아래 예제 소스코드는 Window컴포넌트로 기본적인 윈도우 객체를 생성한다.
main.qml
import QtQuick 2.11
import QtQuick.Window 2.11

Window {
    id: idWindow
    visible: true
    width: 640
    height: 480
    title: qsTr("Hello World")
}
Item
이 컴포넌트 자체만으로는 화면에 아무것도 표시하지 않지만 모든 시각적 컴포넌트들은 이컴포넌트를 상속받는다. 그러므로 이 요소가 가지는 속성(프로퍼티)들은 모든 시각적 컴포넌트들이 기본으로 사용할 수 있다.
기본적 지오메트리(geometry) 속성인 x, y, z와 width, height 이있다. 투명도, 스케일, 회전등을 설정 할 수 있다.
Item{
    id: basicItem
    x: 0
    y: 0
    z: 0
    width: 100
    height: 100
    visible: true         // 시각적으로 표시할지를 설정
    opacity: 0.4          // 불투명도를 설정 1이면 완전한 불투명, 0이면 완전한 투명이다.
    scale: 1
}
아래의 예제 처럼 사용될 수 있다.
import QtQuick 2.11
import QtQuick.Window 2.11

Window {
    id: idWindow
    visible: true
    width: 320
    height: 240
    title: qsTr("Hello World")

    Item{
        id: basicItem
        x: 0
        y: 0
        z: 0

        width: parent.width   // 부모(Window)의 폭을 사용
        height: parent.height // 부모(Window)의 높이를 사용

        visible: true
        opacity: 0.3
        scale: 0.7

        Rectangle{
            width: 200
            height: 100
            anchors.centerIn: parent
            color: "black"
            border.width: 1
            border.color: "black"
        }
    }
}
Rectangle
시각적 속성들을 포함한 사각형 아이템이다. Item의 기본요소와 color 및 radius등을 설정할 수 있다.
Rectangle{
    width: 200
    height: 100
    color: "yellow"
    border.width: 1
    border.color: "black"
}
Window객체안에 Rectangle을 배치하였다.
import QtQuick 2.11
import QtQuick.Window 2.11

Window {
    id: idWindow
    visible: true
    width: 320
    height: 240
    title: qsTr("Hello World")

    Rectangle{
        width: 200
        height: 100
        anchors.centerIn: parent  // 상위 컴포넌트(window)의 중앙에 배치
        color: "yellow"
        border.width: 1           // 가장자리 선의 굵기
        border.color: "black"     // 가장자리 선의 컬러
    }
}

Text
문자열을 출력할 수 있는 컴포넌트이다. 출력할 문자열을 text프로퍼티에 설정한다. font 프로퍼티를 통해서는 글꼴의 모양, 사이즈, 굵기 등의 상세 설정을 할 수 있다. qsTr("") 함수는 문자열 번역을위해 사용한다.
Text {
    text: qsTr("텍스트 컴포넌트")
    font.pixelSize: 20
    font.bold: true
    font.family: "나눔고딕"
    color: "green"
    horizontalAlignment: Text.AlignHCenter
    verticalAlignment: Text.AlignVCenter
}
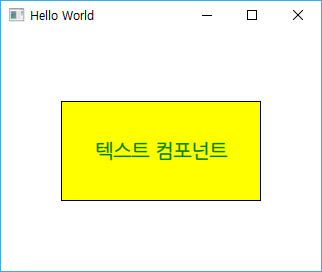
Text컴포넌트를 Rectangle 안에 배치한 모습니다.
import QtQuick 2.11
import QtQuick.Window 2.11

Window {
    id: idWindow
    visible: true
    width: 320
    height: 240
    title: qsTr("Hello World")

    Rectangle{
        width: 200
        height: 100
        anchors.centerIn: parent  // 상위 컴포넌트(Window)의 중앙에 배치
        color: "yellow"
        border.width: 1           // 가장자리 선의 굵기
        border.color: "black"     // 가장자리 선의 컬러

        Text {
            id: title             // 이 객체에 id를 부여 (중복되면 안됨)
            anchors.fill: parent  // 상위 컴포넌트(Rectangle)의 영역을 채운다.
            text: qsTr("텍스트 컴포넌트")
            font.pixelSize: 20
            font.bold: true
            font.family: "나눔고딕"
            color: "green"
            horizontalAlignment: Text.AlignHCenter  // 수평에 대한 중앙 정렬
            verticalAlignment: Text.AlignVCenter    // 수직에 대한 중앙 정렬
        }
    }
}
Image
이미지 아이템을 표시할 수 있다. source 프로퍼티에 이미지 경로를 설정한다.
Image{
    width: 153
    height: 69
    source: "makersweb.png"
}
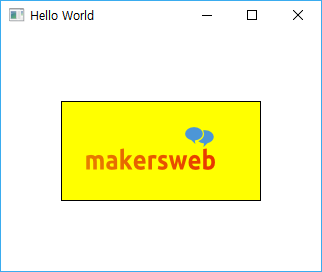
이번에는 Image를 Rectangle안에 배치한 모습
import QtQuick 2.11
import QtQuick.Window 2.11

Window {
    id: idWindow
    visible: true
    width: 320
    height: 240
    title: qsTr("Hello World")

    Rectangle{
        width: 200
        height: 100
        anchors.centerIn: parent
        color: "yellow"
        border.width: 1
        border.color: "black"

        // width, height를 설정하지 않으면 이미지의 원본 사이즈로 표시된다.
        Image{
            anchors.verticalCenter: parent.verticalCenter
            anchors.horizontalCenter: parent.horizontalCenter
            source: "qrc:/makersweb.png"
        }
    }
}
질문등 자유롭게 댓글 남겨주세요..