조회 수 10469 추천 수 0 댓글 0
?

단축키

Prev이전 문서

Next다음 문서

크게 작게 위로 아래로 댓글로 가기 인쇄 첨부
?

단축키

Prev이전 문서

Next다음 문서

크게 작게 위로 아래로 댓글로 가기 인쇄 첨부

이번 시간에는 데이터 모델들을 목록화 할 수 있는 컴포넌트를 다룬다.


데이터 모델을 리스트로 나열할 수 있는 컴포넌트는 지난 강좌에서 잠깐 설명했던 Repeater 와 포지셔닝 컴포넌트인 Column 및 Row를 사용 사용하는 것이다.

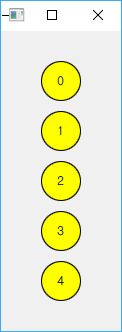
가장 간단한 형태로 Repeater로 지정된 수 만큼 항목을 인스턴스화 시키고 Column과 결합하여 새로로 나열시킬 수 있다. 아래의 예제는 Rectangle 아이템을 5개 객체화 하고 index를 참조하여 새로 형태로 리스팅한다.

import QtQuick 2.11
import QtQuick.Window 2.11

Window {
    id: idWindow
    visible: true
    width: 100
    height: 300
    //    flags: Qt.FramelessWindowHint

    Rectangle{
        id: content
        anchors.fill: parent
        color: "#F0F0F0"

        Column{
            id: list
            anchors.horizontalCenter: parent.horizontalCenter
            anchors.verticalCenter: parent.verticalCenter

            spacing: 10

            Repeater{
                model: 5

                Rectangle{
                    anchors.horizontalCenter: parent.horizontalCenter
                    width: 40
                    height: 40
                    radius: 20
                    border.width: 1
                    color: "yellow"

                    Text {
                        id: text
                        anchors.centerIn: parent
                        text: index
                    }
                }
            }
        }
    }
}


modelView1.png


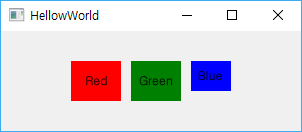
이번에는 단순히 지정된 수 만큼 객체를 나열하는것이 아니라 자바 스크립트 배열을 지정하여 리스트로 만든다. 배열에는 문자열나 숫자등이 들어갈 수 있고 아래 예제에서는

Component가 별도의 qml파일 처럼 배열에 담겨 Repeater의 model로 사용되며 modelData로 접근하여 Loader에 의해 인스턴스화된다. 참고로 Component는 그 자체 만으로는 인스턴스화 되지 않으며 Loader에 의해 런타임중 동적으로 로드시킬 수 있다.   (Component 및 Loader에 대해서는 다음 강좌에서 더 자세히 다룰 것이다.)

import QtQuick 2.11
import QtQuick.Window 2.11

Window {
    id: idWindow
    visible: true
    width: 300
    height: 100
    //    flags: Qt.FramelessWindowHint

    Rectangle{
        id: content
        anchors.fill: parent
        color: "#F0F0F0"

        Row{
            id: list

            anchors.horizontalCenter: parent.horizontalCenter
            anchors.verticalCenter: parent.verticalCenter

            spacing: 10

            Component{
                id: blue
                Rectangle{
                    width: 40
                    height: 30
                    color: "blue"
                    Text {
                        anchors.centerIn: parent
                        text: qsTr("Blue")
                    }
                }
            }

            Component{
                id: red
                Rectangle{
                    width: 50
                    height: 40
                    color: "red"
                    Text {
                        anchors.centerIn: parent
                        text: qsTr("Red")
                    }
                }
            }

            Component{
                id: green
                Rectangle{
                    width: 50
                    height: 40
                    color: "green"
                    Text {
                        anchors.centerIn: parent
                        text: qsTr("Green")
                    }
                }
            }

            Repeater{
                model: [red, green, blue]

                Loader{
                    sourceComponent: modelData
                }
            }
        }
    }
}


modelView2.png


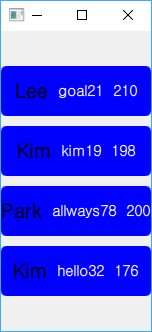
ListModel컴포넌트를 사용하면 조금더 복잡한 데이터 유형들을 설정할 수 있다.ListModel컴포넌트를 사용하면 조금더 복잡한 데이터 유형들을 설정할 수 있다.

import QtQuick 2.11
import QtQuick.Window 2.11

Window {
    id: idWindow
    visible: true
    width: 150
    height: 300
    //    flags: Qt.FramelessWindowHint

    Rectangle{
        id: content
        anchors.fill: parent
        color: "#F0F0F0"

        ListModel{
            id: users
            ListElement{ name: "Lee"; ID: "goal21"; point: 210}
            ListElement{ name: "Kim"; ID: "kim19"; point: 198}
            ListElement{ name: "Park"; ID: "allways78"; point: 200}
            ListElement{ name: "Kim"; ID: "hello32"; point: 176}
        }

        Column{
            id: list

            anchors.horizontalCenter: parent.horizontalCenter
            anchors.verticalCenter: parent.verticalCenter

            spacing: 10

            Repeater{
                model: users

                Rectangle{
                    width: 150
                    height: 50
                    color: "blue"
                    radius: 5

                    Row{
                        spacing: 10
                        anchors.centerIn: parent
                        Text {
                            text: name
                            font.bold: true
                            font.pixelSize: 20
                            anchors.verticalCenter: parent.verticalCenter
                        }
                        Text {
                            text: ID
                            color: "white"
                            font.bold: true
                            font.pixelSize: 15
                            anchors.verticalCenter: parent.verticalCenter
                        }
                        Text {
                            text: point
                            color: "white"
                            font.bold: true
                            font.pixelSize: 15
                            anchors.verticalCenter: parent.verticalCenter
                        }
                    }
                }
            }
        }
    }
}


modelView3.png


  1. No Image notice

    Qt프로그래밍(QtQuick) Beginner를 위한 글 읽는 순서

    Date2019.01.05 CategoryQML and Qt Quick By운영자 Views131086
    read more
  2. 가상키보드(Qt Virtual Keyboard)를 사용하는 방법

    Date2019.05.03 CategoryMobile and Embedded Bymakersweb Views239308
    Read More
  3. Windows에서 Qt D-Bus를 사용하여 프로세스간 통신(IPC)

    Date2019.05.02 CategoryGeneral and Desktop Bymakersweb Views9229
    Read More
  4. No Image

    QML과 QtQuick 모듈 개념과 기본 타입들

    Date2019.04.26 CategoryQML and Qt Quick Bymakersweb Views18392
    Read More
  5. QML 전역 객체 (Global Object)

    Date2019.04.10 CategoryQML and Qt Quick Bymakersweb Views6070
    Read More
  6. tslib의 ts_calibrate를 응용해서 Qt로 터치보정기능 구현

    Date2019.04.06 CategoryQML and Qt Quick Bymakersweb Views6480
    Read More
  7. No Image

    GPU가 없는 장치에서 Qt Quick을 사용

    Date2019.04.02 CategoryQML and Qt Quick Bymakersweb Views8218
    Read More
  8. No Image

    QTextCodec클래스를 사용하여 유니코드와 EUC-KR 변환

    Date2019.03.25 CategoryGeneral and Desktop Bymakersweb Views10764
    Read More
  9. No Image

    qInstallMessageHandler를 이용한 디버그 메세지 출력 제어하기

    Date2019.02.25 CategoryGeneral and Desktop Bymakersweb Views6152
    Read More
  10. Qt5기반 독립 프로세스(out-of-process)로 동작하는 가상키보드(virtual keyboard)

    Date2019.02.24 CategoryMobile and Embedded Bymakersweb Views7205
    Read More
  11. Qml 기본 컴포넌트 강좌 (4) - 모델 리스팅(Listing)

    Date2019.02.23 CategoryQML and Qt Quick By운영자 Views10469
    Read More
  12. Qt Bluetooth를 이용한 시리얼(Serial) 통신

    Date2019.02.17 CategoryMobile and Embedded Bymakersweb Views9913
    Read More
  13. Qml 기본 컴포넌트 강좌 (3) - 배치(positioning) 컴포넌트

    Date2019.02.10 CategoryQML and Qt Quick By운영자 Views12266
    Read More
  14. No Image

    QString 문자열 다루기 예제

    Date2019.01.26 CategoryGeneral and Desktop By운영자 Views51225
    Read More
  15. Qt SQL을 이용한 가벼운 데이터베이스 다루기

    Date2019.01.23 CategoryGeneral and Desktop By운영자 Views12635
    Read More
  16. 구글 클라우드 Speech-To-Text API를 Qt기반(C++, Qml)테스트

    Date2019.01.20 CategoryGeneral and Desktop Bymakersweb Views10717
    Read More
  17. No Image

    QNetworkAccessManager를 통해 HTTP POST 하는 예제

    Date2019.01.17 CategoryGeneral and Desktop Bymakersweb Views9156
    Read More
  18. Qt응용프로그램 실행 시 콘솔창(터미널)같이 띄우기

    Date2019.01.16 CategoryGeneral and Desktop Bymakersweb Views10501
    Read More
  19. 안드로이드 가상장치 사용

    Date2019.01.13 CategoryMobile and Embedded Bymakersweb Views6231
    Read More
  20. No Image

    Qml 기본 컴포넌트 강좌 (2)

    Date2019.01.05 CategoryQML and Qt Quick Bymakersweb Views14353
    Read More
  21. Qml 기본 컴포넌트 강좌 (1)

    Date2019.01.03 CategoryQML and Qt Quick Bymakersweb Views17762
    Read More
Board Pagination Prev 1 5 6 7 8 9 Next
/ 9