
Websocket 을 이용하면 클라이언트와 서버간에 양방향 대화형 통신을 할 수 있다. 클라이언트는 응답을 위해 폴링하지않고도 서버에 메시지를 보내거나 이벤트 기반 응답을 받을 수 있다.
QML에서 Websocket을 사용하려면 먼저 프로젝트파일에 다음줄을 추가한다.
QT += network
그리고 QML에서 QtWebSockets 모듈을 import 한다. Websocket 아이템은 일반적인 아이템 처럼 다음과 같이 사용한다.
import QtWebSockets 1.12
...
    WebSocket {
        id: client
        url: "your Websocket Server URL"
        active: true
    }
...
기본적으로 연결할 서버 주소 및 포트를 url 에 설정한다. ws:// 또는 wss:// 의 2가지 schemes 중 하나를 사용할 수 있으며 지정되지 않으면 ws://가 사용된다.
active 프로퍼티를 true로 설정하면 지정된 URL의 서버에 연결되며 false로 설정하면 연결이 닫힌다. 기본값은 false 다.
예제를 실행하기 위해 Websocket 서버가 필요하다. 이 글에서는 외부에 nodejs로 간단하게 구축한 websocket 서버에 연결해본다.
연결이 수립되면 클라이언트에 메시지를 전송하고 클라이언트로부터의 메시지를 수신한다.
main.js
var WebSocketServer = require("ws").Server;
var wss = new WebSocketServer({ port: 3000 });

wss.on("connection", function(ws) {
ws.send("Hello! I am a server.");
ws.on("message", function(message) {
        console.log("Received: %s", message);
    });
});
앞에서 설명한 대로 서버 URL 등을 설정하고 메시지 수신 처리 슬롯을 구현한다. 그리고 Send용 버튼을 배치하고 클릭하면 서버에 메시지를 보낸다.
main.qml
import QtQuick 2.12
import QtQuick.Window 2.12
import QtQuick.Controls 2.12
import QtWebSockets 1.12

Window{
    visible: true
    width: 640
    height: 480
    title: "WebSocket in Qml"


    WebSocket {
        id: client
        url: "ws://XXX.XXX.XXX.XXX:3000"
        onStatusChanged: {
            if (status === WebSocket.Error) {
                console.log("Error: " + client.errorString)
            } else if (status === WebSocket.Open) {
                console.log("Open Socket")
            } else if (status === WebSocket.Closed) {
                console.log("Socket closed")
            }
        }

        onTextMessageReceived: {
            meesage.text = "Recived Message : " + message
        }

        active: true
    }

    Column {
        anchors.centerIn: parent
        spacing: 50

        Text {
            id: meesage
            anchors.horizontalCenter: parent.horizontalCenter
        }

        Button{
            anchors.horizontalCenter: parent.horizontalCenter
            text: "Send"
            onClicked: {
                client.sendTextMessage("hello makersweb.net")
            }
        }
    }
}
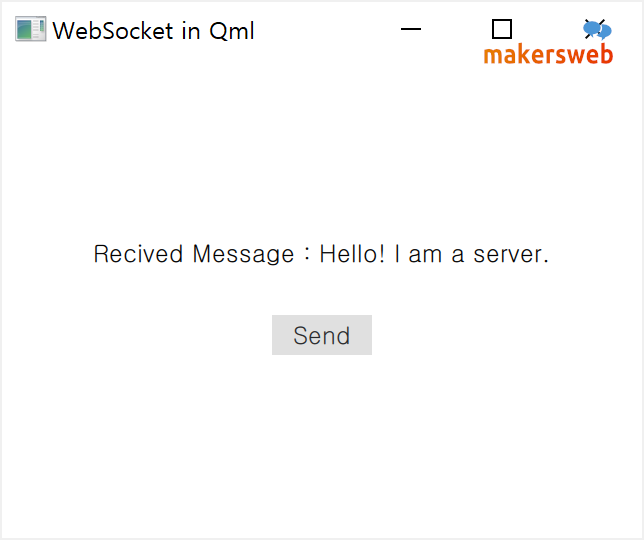
연결이 수립되고 서버에서 보낸 Text 메세지를 수신하고 화면에 출력한다. Send 버튼을 클릭하면 서버로 Text 메시지를 보낸다.
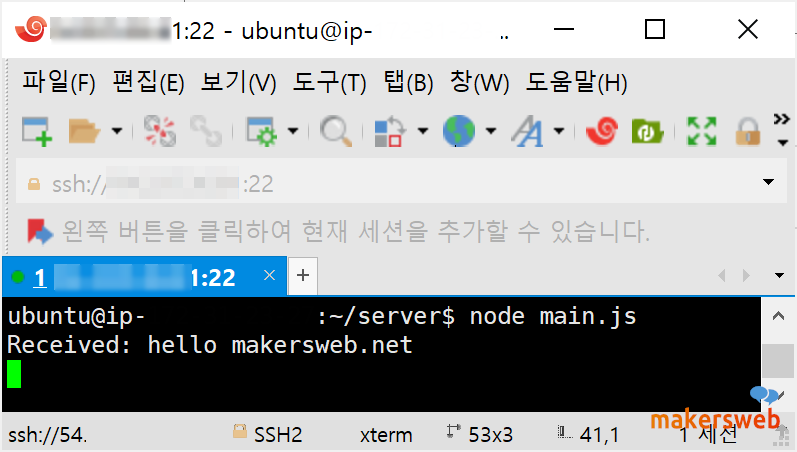
서버에서 메시지를 잘 수신하고 출력하고 있다.
다음에는 WebSocketServer 사용법을 알아보자.
QML 예제 링크:
https://code.qt.io/cgit/qt/qtwebsockets.git/tree/examples/websockets?h=5.15
클라이언트 용 테스트 페이지:
http://livepersoninc.github.io/ws-test-page/
| 번호 | 제목 | 글쓴이 | 날짜 | 조회 수 |
|---|---|---|---|---|
| 공지 | Qt프로그래밍(QtQuick) Beginner를 위한 글 읽는 순서 | 운영자 | 2019.01.05 | 86142 |
| 8 |
QML 에서 QR코드 생성
| makersweb | 2021.08.20 | 894 |
| 7 | QML 코딩 규칙 | makersweb | 2021.09.05 | 3264 |
| » |
QML에서 Websocket 서버와 통신
| makersweb | 2021.09.18 | 834 |
| 5 |
QML에서 앵커(anchors)로 위치 지정
| makersweb | 2021.10.05 | 3871 |
| 4 | Binding 타입으로 객체 속성 간 묶기 | makersweb | 2022.03.04 | 428 |
| 3 |
OpacityMask 예제
| makersweb | 2023.01.26 | 649 |
| 2 |
QML에서 D-Bus 통신
| makersweb | 2023.03.15 | 701 |
| 1 | QtQuick 애플리케이션에 Rive 애니메이션 통합 | makersweb | 2024.03.31 | 409 |