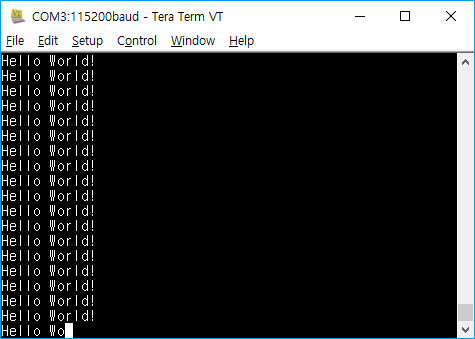
개발시 어떤 값을 화면을 통해 출력해서 디버깅해야할때 printf를 사용하면 많은 도움이된다.
프로젝트의 개발환경마다 다르겠지만 일반적으로 임베디드장치를 타겟(Target)으로 하는경우 printf의 표준 출력을 Serial통신으로 구현하게된다.
STM32에서 printf()함수로 출력할 문자열이 호스트의 콘솔 화면에 찍히도록 먼저 USART설정하는 방법알아보자.
호스트 운영체제: 윈도우10
IDE: Visual Studio Code + PlatformIO
여기서도 LibOpenCM3을 사용할 것이며 다음은 전송 속도가 115200이고 전송 핀이 포트 A핀 9에 연결된 USART1을 초기화하는 예를 보여준다.
#include <libopencm3/stm32/rcc.h>
#include <libopencm3/stm32/gpio.h>
#include <libopencm3/stm32/usart.h>

static void clock_setup(void)
{
    rcc_clock_setup_in_hse_8mhz_out_24mhz();

    /* Enable clocks for GPIO port A (for GPIO_USART1_TX) and USART1. */
    rcc_periph_clock_enable(RCC_GPIOA);
    rcc_periph_clock_enable(RCC_USART1);
}

static void usart_setup(void)
{
    /* Setup GPIO pin GPIO_USART1_TX/GPIO9 on GPIO port A for transmit. */
    gpio_set_mode(GPIOA, GPIO_MODE_OUTPUT_50_MHZ,
              GPIO_CNF_OUTPUT_ALTFN_PUSHPULL, GPIO_USART1_TX);

    /* Setup UART parameters. */
    usart_set_baudrate(USART1, 115200);
    usart_set_databits(USART1, 8);
    usart_set_stopbits(USART1, USART_STOPBITS_1);
    usart_set_mode(USART1, USART_MODE_TX);
    usart_set_parity(USART1, USART_PARITY_NONE);
    usart_set_flow_control(USART1, USART_FLOWCONTROL_NONE);

    /* Finally enable the USART. */
    usart_enable(USART1);
}
운영 체제가 없는 임베디드 시스템을 대상으로 할 때 시스템에서 열기, 읽기 및 종료와 같은 syscall은 실제로 의미가 없으므로 전체 표준 라이브러리에 연결하지 않고 컴파일하는 경향이 있다. 이것은 -lnosys와 연결하여 수행되는 작업의 일부로 syscall을 스텁 함수로 대체한다.
예를 들어 POSIX 쓰기 호출은 결국 프로토 타입이있는 함수를 호출한다.
ssize_t _write (int file, const char *ptr, ssize_t len);
따라서 printf가 결국 write를 호출 할 경우 백업 _write 메소드를 다시 구현하여 대신 해당 데이터를 serial로 푸시하면 stdout 및 stderr을 실제로 볼 수있는 곳(Host)으로 리디렉션 할 수 있다.
int _write(int file, const char *ptr, ssize_t len) {
    // If the target file isn't stdout/stderr, then return an error
    // since we don't _actually_ support file handles
    if (file != STDOUT_FILENO && file != STDERR_FILENO) {
        // Set the errno code (requires errno.h)
        errno = EIO;
        return -1;
    }

    // Keep i defined outside the loop so we can return it
    int i;
    for (i = 0; i < len; i++) {
        // If we get a newline character, also be sure to send the carriage
        // return character first, otherwise the serial console may not
        // actually return to the left.
        if (ptr[i] == '\n') {
            usart_send_blocking(USART1, '\r');
        }

        // Write the character to send to the USART1 transmit buffer, and block
        // until it has been sent.
        usart_send_blocking(USART1, ptr[i]);
    }

    // Return the number of bytes we sent
    return i;
}
만약 C++ 코드 인 경우 다음과 같이 선언하는 것을 잊지 말자.
extern "C" {
    ssize_t _write(int file, const char *ptr, ssize_t len);
}
다음의 헤더를 포함한다.
#include <stdio.h>
#include <errno.h>
#include <unistd.h>
이제 printf출력은 serial 콘솔로 확인할 수 있다.
int main(void)
{
    int i = 0;

    clock_setup();
    usart_setup();

    while (1) {
        printf("Hello World!\n");
        for (i = 0; i < 800000; i++) /* Wait a bit. */
            __asm__("NOP");
    }
    return 0;
}
