
Raspberry Pi 의 I²C 주변 장치는 기본적으로 켜져 있지 않다. raspi-config를 사용하여 활성화할 수 있다.
아래 명령을 입력했을 때,
ls /dev/*i2c*
다음과 같이 출력되어야 한다.
/dev/i2c-1
I2C 인터페이스를 작동시키는 데 도움이 되는 일련의 명령줄 유틸리티 프로그램이 있다. apt 패키지 관리자를 사용하여 얻을 수 있다.
sudo apt install -y i2c-tools
특히 i2cdetect 은 버스의 모든 주소를 조사하고 장치가 있는지 여부를 표시해준다.
다음 명령줄을 입력해본다. -y 플래그는 확인을 기다릴 필요가 없도록 한다. 1은 I2C 버스 1(예: i2c-1)에서 I2C 장치를 스캔하고 있음을 나타낸다.
$ i2cdetect -y 1
     0  1  2  3  4  5  6  7  8  9  a  b  c  d  e  f
00:          -- -- -- -- -- -- -- -- -- -- -- -- --
10: -- -- -- -- -- -- -- -- -- -- -- -- -- -- -- --
20: -- -- -- -- -- -- -- -- -- -- -- -- -- -- -- --
30: -- -- -- -- -- -- -- -- -- -- -- -- -- -- -- --
40: -- -- -- -- -- -- -- -- -- -- -- -- -- -- -- --
50: -- -- -- -- -- -- -- -- -- -- -- -- -- -- -- --
60: -- -- -- -- -- -- -- -- -- -- -- -- -- -- -- --
70: -- -- -- -- -- -- -- --
Arduino (ATtiny85) 측 slave 예제
// Wire Slave Sender
#include <TinyWire.h>
#include <twi.h>

void setup() {
  // config TinyWire library for I2C slave functionality
  TinyWire.begin( 0x8 );
  // register a handler function in case of a request from a master
  TinyWire.onRequest( requestEvent );
}

void loop() {
  delay(100);
}

// function that executes whenever data is requested by master
// this function is registered as an event, see setup()
void requestEvent() {
  String data = "hello makersweb.net";
  TinyWire.send(1);
  TinyWire.send(data.c_str(), data.length());
}
라이브러리: https://github.com/lucullusTheOnly/TinyWire
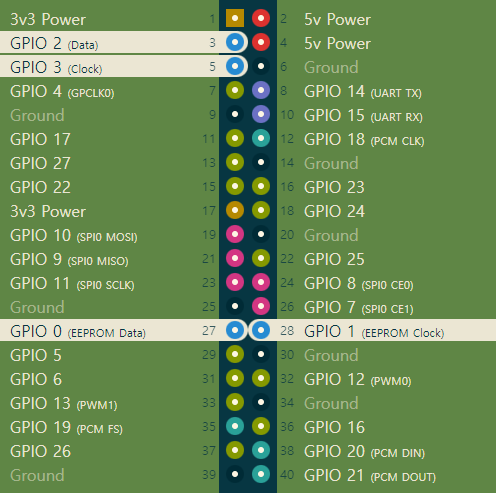
배선
Raspberry Pi PIN Map
GPIO 2 - I²C 핀 중 SDA(I2C1 데이터), GPIO 3 - I²C 핀 중 SCL(I2C1 클럭).
ATtiny85 PIN Map
ATtiny85 마이크로컨트롤러에서 SDA 핀은 PB0이고 SCL 핀은 PB2이다.

ATtiny85 (Slave) 장치와 연결하고 Raspberry Pi 에서 다시 i2cdetect 명령줄을 입력해본다.
$ i2cdetect -y 1
     0  1  2  3  4  5  6  7  8  9  a  b  c  d  e  f
00:          -- -- -- -- -- 08 -- -- -- -- -- -- --
10: -- -- -- -- -- -- -- -- -- -- -- -- -- -- -- --
20: -- -- -- -- -- -- -- -- -- -- -- -- -- -- -- --
30: -- -- -- -- -- -- -- -- -- -- -- -- -- -- -- --
40: -- -- -- -- -- -- -- -- -- -- -- -- -- -- -- --
50: -- -- -- -- -- -- -- -- -- -- -- -- -- -- -- --
60: -- -- -- -- -- -- -- -- -- -- -- -- -- -- -- --
70: -- -- -- -- -- -- -- --
Raspberry Pi 측 master 예제
#include "pi2c.h"

int main(){
    Pi2c arduino(8); //Create a new object "arduino" using address "0x08"
    char data[20] = {0,}; //Create a buffer of char (single bytes) for the data

    //Receive from the Arduino and put the contents into the "data" char array
    arduino.i2cRead(data, sizeof(data));
    //Print out what the Arduino is sending...
    std::cout << "Arduino Says: " << data << std::endl;

    //Send an 16 bit integer
    //arduino.i2cWriteArduinoInt(4356);

    return 0;
}
라이브러리: https://github.com/JohnnySheppard/Pi2c
실행

| 번호 | 제목 | 글쓴이 | 날짜 | 조회 수 |
|---|---|---|---|---|
| 12 |
POSIX를 지원하는 오픈소스 RTOS, RTEMS
| makersweb | 2020.04.15 | 1732 |
| 11 |
라즈베리파이2에서 RTOS기반 GPIO제어(LED)
| makersweb | 2020.04.21 | 1645 |
| 10 | Raspberry Pi 의 프레임버퍼(Framebuffer)구성 | makersweb | 2020.05.15 | 1827 |
| 9 |
Android 기기를 사용하여 Raspberry Pi SD 카드 작성 방법
| makersweb | 2020.08.01 | 999 |
| 8 | 플랫폼 디바이스 및 디바이스 트리 | makersweb | 2021.03.20 | 3975 |
| 7 |
ATtiny85 개발보드(HW-260)
| makersweb | 2023.01.02 | 463 |
| 6 |
임베디드 개발자를 위한 Hex,Bin,Dec 변환기 유틸
| makersweb | 2023.02.27 | 1131 |
| 5 |
로직분석기와 함께 PulseView 를 사용해서 CAN 신호 캡쳐
| makersweb | 2023.03.16 | 627 |
| » |
Raspberry Pi 와 ATtiny85 간 I²C 통신
| makersweb | 2023.03.18 | 449 |
| 3 | Yocto 프로젝트 3.4 릴리스(honister) 이상 버전으로 마이그레이션 시 참고 사항 | makersweb | 2023.03.21 | 955 |
| 2 | Raspberry Pi에서 I²C 그리고 Bit-bang (비트뱅) | makersweb | 2023.08.27 | 488 |
| 1 | Rockchip VOP | makersweb | 2024.04.22 | 89 |