Qt3D의 QML타입으로 외부 3D Mesh 데이터(.obj 파일)을 Rendering하는방법과 그를 위해 기본적으로 필요한 모듈, 간단한 사용 예제를 소개한다.
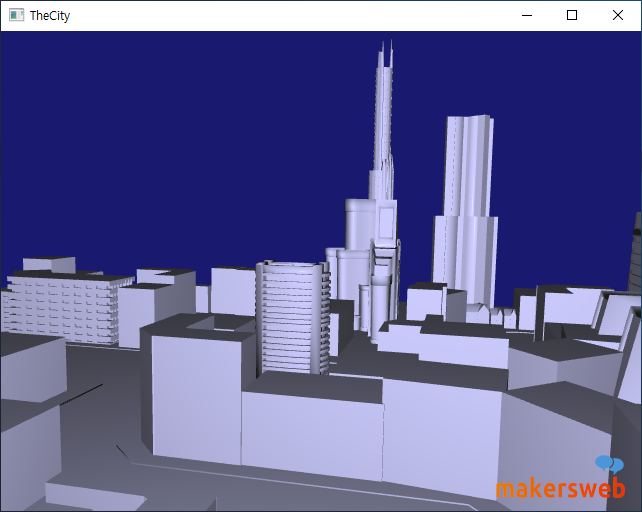
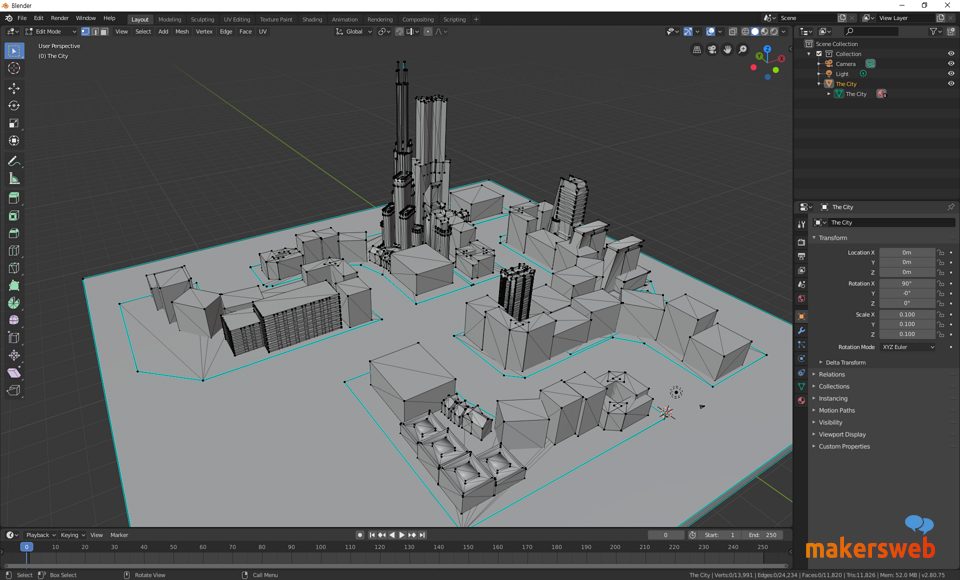
다음과 같이 obj 파일로 모델링된 도시(City) Mesh 데이터가 있다. 이 3D Mesh 데이터를 응용프로그램 안에 넣고, 텍스처를 입히고, 재질 및 효과를주고 싶다고 치자. Qt3D로 이런일들이 가능하지만 여기서는 단순히 3D 데이터를 넣고 기본 컬러만 설정할 것이다.
먼저 2D 또는 3D 렌더링, 사용자 입력등을 처리하는 QtQuick 응용 프로그램의 경우 *.pro 파일에 다음 줄을 추가한다.
다음과 같이 QML모듈이 필요하다.
// QtQuick2와 Scene통합을 제공
import QtQuick.Scene3D 2.12

// 사용되는 QML 모듈
import Qt3D.Core 2.12
import Qt3D.Render 2.12
import Qt3D.Extras 2.12
import Qt3D.Input 2.12
main.cpp
#include <QGuiApplication>
#include <QQmlApplicationEngine>
#include <QQuickView>

int main(int argc, char *argv[])
{
    QCoreApplication::setAttribute(Qt::AA_EnableHighDpiScaling);
    QGuiApplication app(argc, argv);

    QQuickView view;
    view.resize(640, 480);
    view.setResizeMode(QQuickView::SizeRootObjectToView);
    view.setSource(QUrl("qrc:/main.qml"));
    view.show();

    return app.exec();
}
main.qml
import QtQuick 2.12
import QtQuick.Controls 2.12
import QtQuick.Window 2.12
import QtQuick.Scene3D 2.12


import Qt3D.Core 2.12
import Qt3D.Render 2.12
import Qt3D.Extras 2.12
import Qt3D.Input 2.12

Item {
    visible: true
    width: 640
    height: 480

    // Scene
    Rectangle{
        anchors.fill: parent

        Scene3D{
            focus: true
            anchors.fill: parent
            aspects: ["input", "logic"]
            cameraAspectRatioMode: Scene3D.AutomaticAspectRatio

            Entity {
                id: sceneRoot

                Camera {
                    id: camera
                    projectionType: CameraLens.PerspectiveProjection
                    fieldOfView: 45
                    nearPlane: 1.0
                    farPlane: 1000.0
                    position: Qt.vector3d(9.02537, 32.57, 30.6101)
                    upVector: Qt.vector3d(-0.159851, 0.950096, -0.267888)
                    viewCenter: Qt.vector3d(-11.2513, 16.2316, -8.57445)
                }

                FirstPersonCameraController {
                    camera: camera
                }

                Entity {
                    DirectionalLight {
                        id: directional
                        worldDirection: Qt.vector3d(0.3, -1.0, 5.0).normalized();
                        color: "#fff2a3"
                        intensity: 0.01
                    }
                    Transform {
                        id: lightpostransform
                        translation: Qt.vector3d(0.0, 50.0, 60.0)
                    }
                    components: [lightpostransform, directional]
                }

                Entity {
                    PointLight {
                        id: pointL
                        color: "#fff2a3"
                    }
                    Transform{
                        id: plightpostransform
                        translation: Qt.vector3d(0.0, 4.0, 15.0)
                    }
                    components: [plightpostransform, pointL]
                }

                RenderSettings {
                    id: render
                    activeFrameGraph: ForwardRenderer {
                        id: renderer
                        clearColor: "midnightblue"
                        camera: camera
                    }
                }

                InputSettings { id: input }

                components:[render, input]

                Entity {
                    Mesh {
                        id: vehiclemesh
                        source: "qrc:/object/asset/TheCity.obj"
                    }

                    Transform {
                        id: transform
                        property real scale: 0.1 //1.0
                        scale3D: Qt.vector3d(scale, scale, scale)
                        rotationX: 0.0
                        rotationY: 35.0
                        rotationZ: 0.0
                    }

                    VehicleMaterial{
                        id: material
                    }

                    Entity {
                        components: [vehiclemesh, transform, material]
                    }
                }
            }
        }
    }
}
VehicleMaterial.qml
import Qt3D.Core 2.12
import Qt3D.Render 2.12

Material {
    id: material

    property vector3d lightPosition: Qt.vector3d(30.0, 30.0, 0.0)
    property vector3d lightIntensity: Qt.vector3d(1.0, 1.0, 1.0)

    property color ambientColor: Qt.rgba(0.1, 0.1, 0.1, 1.0)
    property color diffuseColor: Qt.rgba(0.7, 0.7, 0.9, 1.0)
    property color specularColor: Qt.rgba(0.1, 0.1, 0.1, 1.0)
    property real shininess: 150.0

    parameters: [
        Parameter { name: "ka"; value: Qt.vector3d(material.ambientColor.r, material.ambientColor.g, material.ambientColor.b) },
        Parameter { name: "kd"; value: Qt.vector3d(material.diffuseColor.r, material.diffuseColor.g, material.diffuseColor.b) },
        Parameter { name: "ks"; value: Qt.vector3d(material.specularColor.r, material.specularColor.g, material.specularColor.b) },
        Parameter { name: "shininess"; value: material.shininess }
    ]

    effect: Effect {
        property string vertex: "qrc:/shaders/program/simpleColor.vert"
        property string fragment: "qrc:/shaders/program/simpleColor.frag"

        FilterKey {
            id: forward
            name: "renderingStyle"
            value: "forward"
        }

        ShaderProgram {
            id: gl3Shader
            vertexShaderCode: loadSource(parent.vertex)
            fragmentShaderCode: loadSource(parent.fragment)
        }

        AlphaCoverage { id: alphaCoverage }

        DepthTest {
            id: depth
            depthFunction: DepthTest.Less
        }

        techniques: [
            // OpenGL 3.1
            Technique {
                parameters: [
                    Parameter { name: "light.position"; value: Qt.vector4d( 0.0, 0.0, 0.0, 1.0 ) },
                    Parameter { name: "light.intensity"; value: Qt.vector3d( 1.0, 1.0, 1.0 ) }
                ]

                filterKeys: [ forward ]
                graphicsApiFilter {
                    api: GraphicsApiFilter.OpenGL
                    profile: GraphicsApiFilter.CoreProfile
                    majorVersion: 3
                    minorVersion: 1
                }
                renderPasses: RenderPass {
                    shaderProgram: gl3Shader
                    renderStates: [alphaCoverage ]
                }
            }
        ]
    }
}
Scene3D : QtQuick2 와 Scene의 통합을 제공
Carmera : 장면이 렌더링 될 시점을 정의.
Entity : 여러 Component3D 인스턴스를 집계 할 수있는 노드 서브 클래스.
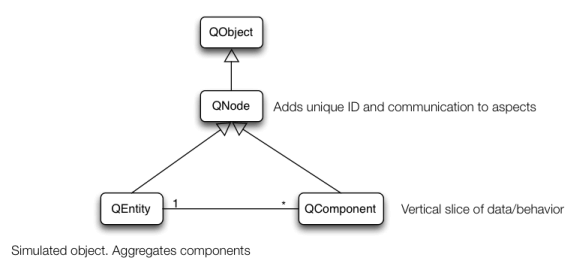
렌더링과 관련된 QComponent는 다음과 같다.
Mesh : 외부 사용자 3D Mesh 데이터
Material : 머티리얼은 엔티티의 렌더링을 지정하는 방법을 제공.
Transform : 메쉬에서 변형을 수행하는 데 사용.
예제에서 사용되는 셰이더 프로그램
simpleColor.frag
#version 330 core

//uniform mat4 viewMatrix;

uniform struct LightInfo {
    vec4 position;
    vec3 intensity;
} light;

uniform vec3 ka;            // Ambient reflectivity
uniform vec3 kd;            // Diffuse reflectivity
uniform vec3 ks;            // Specular reflectivity
uniform float shininess;    // Specular shininess factor

in vec3 position;
in vec3 normal;

out vec4 fragColor;

vec3 dsModel(const in vec3 pos, const in vec3 n)
{
    // Calculate the vector from the light to the fragment
    vec3 s = normalize( vec3( light.position ) - pos );

    // Calculate the vector from the fragment to the eye position (the
    // origin since this is in "eye" or "camera" space
    vec3 v = normalize( -pos );

    // Refleft the light beam using the normal at this fragment
    vec3 r = reflect( -s, n );

    // Calculate the diffus component
    vec3 diffuse = vec3( max( dot( s, n ), 0.0 ) );

    // Calculate the specular component
    vec3 specular = vec3( pow( max( dot( r, v ), 0.0 ), shininess ) );

    // Combine the ambient, diffuse and specular contributions
    return light.intensity * ( ka + kd * diffuse + ks * specular );
}

void main()
{
    //output color from material
    fragColor = vec4(dsModel(position, normalize(normal)), 1.0);
}
simpleColor.vert
#version 330 core

in vec3 vertexPosition;
in vec3 vertexNormal;

out vec3 position;
out vec3 normal;

uniform mat4 modelView;
uniform mat3 modelViewNormal;
uniform mat4 mvp;

void main()
{
    normal = normalize( modelViewNormal * vertexNormal );
    position = vec3( modelView * vec4( vertexPosition, 1.0 ) );

    gl_Position = mvp * vec4( vertexPosition, 1.0 );
}
결과 장면
키보드와 마우스를 이용한 카메라 조작이 가능하다.