한국어
Qt
 

ShaderEffect을 이용하면 다양한 그래픽효과를 구현할 수 있다. 이를 이용해서 버튼의 클릭 효과를 구현해본다.
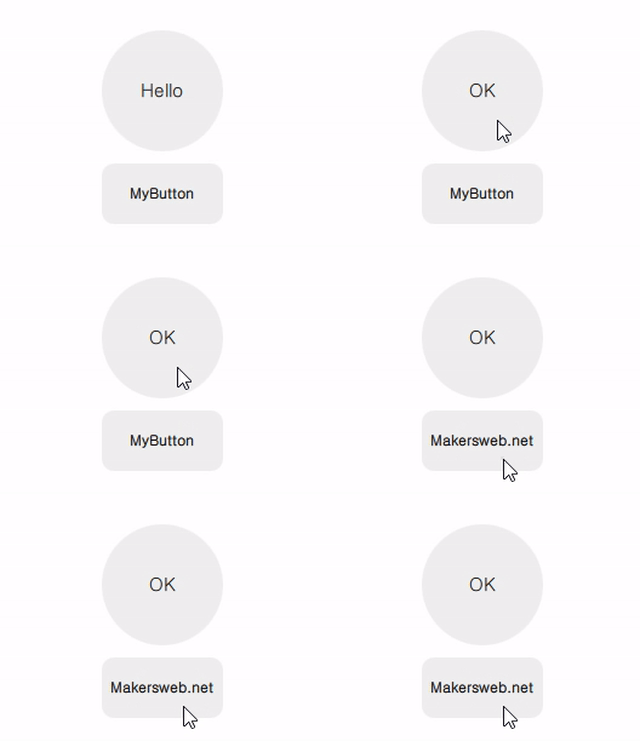
ShaderEffectQmlButton.gif


MyButton.qml

import QtQuick 2.2

Item{

    signal clicked()
    signal pressed()

    property alias radius: base.radius

    Rectangle{
        id: base

        radius: 10
        anchors.fill: parent
        color: "#10000000"
    }

    ShaderEffect {
        id: shaderEffect1
        opacity: 1
        anchors.fill: parent

        property variant source: effectSource

        ShaderEffectSource {
            id: effectSource
            sourceItem: base
            hideSource: true
        }

        property point normTouchPos
        property real widthToHeightRatio: height / width
        // animated uniform property
        property real spread: 0

        ParallelAnimation {
            id: touchStartAnimation
            UniformAnimator {
                uniform: "spread";
                target: shaderEffect1
                from: 0; to: 1
                duration: 300
                easing.type: Easing.InQuad
            }
            onStopped: {
                // animation stopped
                if(!touch.pressed){
                    if(shaderEffect1.spread != 0)
                        shaderEffect1.spread = 0
                }
            }
        }

        fragmentShader: "
            uniform sampler2D source;
            varying mediump vec2 qt_TexCoord0;
            uniform lowp float qt_Opacity;
            uniform mediump vec2 normTouchPos;
            uniform mediump float widthToHeightRatio;
            uniform mediump float spread;

            void main() {
                mediump float radius = (0.5 + abs(0.5 - normTouchPos.x)) * 1.0 * spread;
                mediump vec2 circleCenter =
                    normTouchPos + (vec2(0.5) - normTouchPos) * radius * 2.0;

                mediump float circleX = (qt_TexCoord0.x - circleCenter.x);
                mediump float circleY = (qt_TexCoord0.y - circleCenter.y) * widthToHeightRatio;

                highp vec4 color = texture2D(source, qt_TexCoord0);

                lowp vec4 tapOverlay =
                    color * step(circleX*circleX + circleY*circleY, radius*radius);
                gl_FragColor = (color + tapOverlay) * qt_Opacity;
            }
        "

        function touchStart(x, y) {
            normTouchPos = Qt.point(x / width, y / height)
            touchStartAnimation.start()
        }

        function touchStop() {
            touchStartAnimation.stop()
        }
    }

    MouseArea{
        id: touch
        anchors.fill: parent
        onPressed: {
            shaderEffect1.touchStop()
            shaderEffect1.touchStart(mouseX, mouseY)
        }
        onClicked: {
            parent.clicked()
            shaderEffect1.spread = 0
        }
        onExited: {
            shaderEffect1.spread = 0
        }
    }
}


다음은 구현된 MyButton을 사용하는 방법이다.

main.qml

import QtQuick 2.2
import QtQuick.Window 2.2
import QtQuick.Layouts 1.3

Window {
    visible: true
    width: 320
    height: 240
    title: qsTr("ShaderEffect Custom Button")

    ColumnLayout{
        anchors.centerIn: parent
        spacing: 10

        MyButton{
            width: 100
            height: 100
            radius: 50
            Layout.alignment: Qt.AlignHCenter

            Text {
                id: button0_text
                anchors.centerIn: parent
                text: qsTr("Hello")
                font.pixelSize: 15
            }

            onClicked: {
                if(button0_text.text == "Hello")
                    button0_text.text = "OK"
                else{
                    button0_text.text = "Hello"
                }
            }
        }

        MyButton{
            width: 100
            height: 50
            Layout.alignment: Qt.AlignHCenter

            Text {
                id: button1_text
                anchors.centerIn: parent
                text: qsTr("MyButton")
                font.bold: true
            }

            onClicked: {
                if(button1_text.text == "MyButton")
                    button1_text.text = "Makersweb.net"
                else{
                    button1_text.text = "MyButton"
                }
            }
        }
    }
}


번호 제목 글쓴이 날짜 조회 수
공지 Qt프로그래밍(QtQuick) Beginner를 위한 글 읽는 순서 운영자 2019.01.05 116945
140 Android 애플리케이션 서명 구성 file makersweb 2023.12.17 4525
139 QML 전역 객체 (Global Object) file makersweb 2019.04.10 4551
138 Qt 6의 비동기 API makersweb 2020.10.19 4571
137 QML에서 D-Bus 통신 file makersweb 2023.03.15 4581
136 클라우드용 Qt file makersweb 2024.01.16 4627
135 표를 만들고 PDF문서로 출력하기 file makersweb 2018.09.30 4633
134 Visual Studio Code용 Qt 확장팩 file makersweb 2024.10.09 4691
133 QProcess 예제 (프로그램 재시작) file makersweb 2023.01.25 4762
132 qInstallMessageHandler를 이용한 디버그 메세지 출력 제어하기 makersweb 2019.02.25 4786
131 Qt for Embedded Linux 화면출력 makersweb 2019.10.17 4887
130 Qt Quick Controls 2에 네이티브 데스크탑 스타일 추가 file makersweb 2020.11.23 4911
129 Qt로 작성된 iOS 앱에서 시리얼 통신 file makersweb 2022.04.30 4936
128 Qt 하이브리드 애플리케이션(Hybrid App) 개발 file makersweb 2023.02.08 4959
127 2020년에 변경되는 Qt 오퍼 (Qt offering changes 2020) [2] j2doll 2020.01.31 4973
126 Qt로 XML 파싱 : Qt 6에서 업데이트된 (Parsing XML with Qt: Updates for Qt 6) [1] j2doll 2020.01.16 5133
125 MCU용 Qt에 대해서 makersweb 2019.08.22 5151
124 Qt Quick 3D 소개 makersweb 2019.11.09 5161
123 Base64로 인코딩된 파일을 복원 makersweb 2023.08.06 5162
122 컨테이너에 적재된 객체를 편리하게 삭제하기 makersweb 2019.09.18 5168
121 QOpenGLWidget 을 투명하게 적용 file makersweb 2020.02.05 5170