한국어
Qt
 

ShaderEffect을 이용하면 다양한 그래픽효과를 구현할 수 있다. 이를 이용해서 버튼의 클릭 효과를 구현해본다.
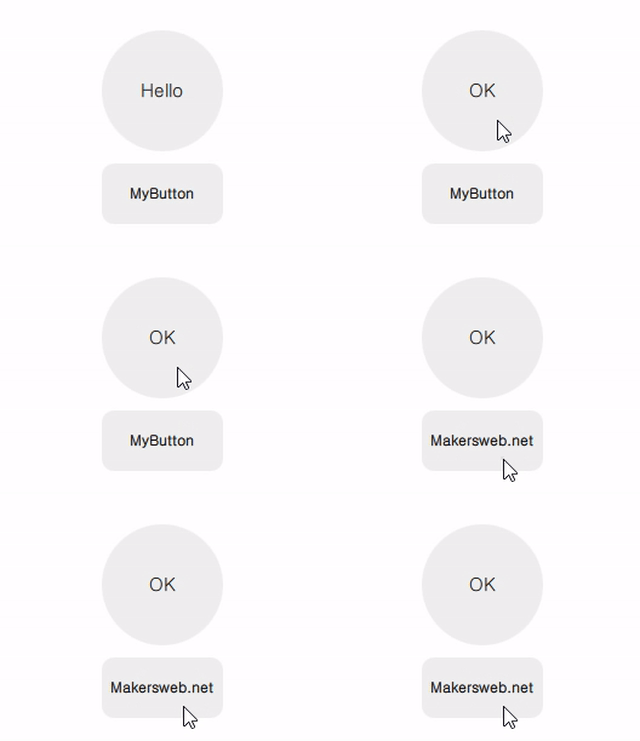
ShaderEffectQmlButton.gif


MyButton.qml

import QtQuick 2.2

Item{

    signal clicked()
    signal pressed()

    property alias radius: base.radius

    Rectangle{
        id: base

        radius: 10
        anchors.fill: parent
        color: "#10000000"
    }

    ShaderEffect {
        id: shaderEffect1
        opacity: 1
        anchors.fill: parent

        property variant source: effectSource

        ShaderEffectSource {
            id: effectSource
            sourceItem: base
            hideSource: true
        }

        property point normTouchPos
        property real widthToHeightRatio: height / width
        // animated uniform property
        property real spread: 0

        ParallelAnimation {
            id: touchStartAnimation
            UniformAnimator {
                uniform: "spread";
                target: shaderEffect1
                from: 0; to: 1
                duration: 300
                easing.type: Easing.InQuad
            }
            onStopped: {
                // animation stopped
                if(!touch.pressed){
                    if(shaderEffect1.spread != 0)
                        shaderEffect1.spread = 0
                }
            }
        }

        fragmentShader: "
            uniform sampler2D source;
            varying mediump vec2 qt_TexCoord0;
            uniform lowp float qt_Opacity;
            uniform mediump vec2 normTouchPos;
            uniform mediump float widthToHeightRatio;
            uniform mediump float spread;

            void main() {
                mediump float radius = (0.5 + abs(0.5 - normTouchPos.x)) * 1.0 * spread;
                mediump vec2 circleCenter =
                    normTouchPos + (vec2(0.5) - normTouchPos) * radius * 2.0;

                mediump float circleX = (qt_TexCoord0.x - circleCenter.x);
                mediump float circleY = (qt_TexCoord0.y - circleCenter.y) * widthToHeightRatio;

                highp vec4 color = texture2D(source, qt_TexCoord0);

                lowp vec4 tapOverlay =
                    color * step(circleX*circleX + circleY*circleY, radius*radius);
                gl_FragColor = (color + tapOverlay) * qt_Opacity;
            }
        "

        function touchStart(x, y) {
            normTouchPos = Qt.point(x / width, y / height)
            touchStartAnimation.start()
        }

        function touchStop() {
            touchStartAnimation.stop()
        }
    }

    MouseArea{
        id: touch
        anchors.fill: parent
        onPressed: {
            shaderEffect1.touchStop()
            shaderEffect1.touchStart(mouseX, mouseY)
        }
        onClicked: {
            parent.clicked()
            shaderEffect1.spread = 0
        }
        onExited: {
            shaderEffect1.spread = 0
        }
    }
}


다음은 구현된 MyButton을 사용하는 방법이다.

main.qml

import QtQuick 2.2
import QtQuick.Window 2.2
import QtQuick.Layouts 1.3

Window {
    visible: true
    width: 320
    height: 240
    title: qsTr("ShaderEffect Custom Button")

    ColumnLayout{
        anchors.centerIn: parent
        spacing: 10

        MyButton{
            width: 100
            height: 100
            radius: 50
            Layout.alignment: Qt.AlignHCenter

            Text {
                id: button0_text
                anchors.centerIn: parent
                text: qsTr("Hello")
                font.pixelSize: 15
            }

            onClicked: {
                if(button0_text.text == "Hello")
                    button0_text.text = "OK"
                else{
                    button0_text.text = "Hello"
                }
            }
        }

        MyButton{
            width: 100
            height: 50
            Layout.alignment: Qt.AlignHCenter

            Text {
                id: button1_text
                anchors.centerIn: parent
                text: qsTr("MyButton")
                font.bold: true
            }

            onClicked: {
                if(button1_text.text == "MyButton")
                    button1_text.text = "Makersweb.net"
                else{
                    button1_text.text = "MyButton"
                }
            }
        }
    }
}


번호 제목 글쓴이 날짜 조회 수
공지 Qt프로그래밍(QtQuick) Beginner를 위한 글 읽는 순서 운영자 2019.01.05 118890
80 라즈베리파이3에서 Boot to Qt 실행해보기 makersweb 2019.11.13 6530
79 OpenGL 렌더링을 QtQuick과 통합하는 방법 file makersweb 2019.10.01 6418
78 QML과 JavaScript 의 숫자 관련 내장된 함수 makersweb 2021.03.28 6244
77 [Qt] Google Play의 향후 요구 사항을 준수하는 방법 [2] j2doll 2019.07.29 6221
76 QOpenVirtualkeyboard(Qt 5용 한글 및 영문, 숫자 가상키보드) file makersweb 2019.11.27 6201
75 clazy 로 13개의 시그널, 슬롯 오류 해결 makersweb 2022.08.23 6176
74 컨테이너에 적재된 객체를 편리하게 삭제하기 makersweb 2019.09.18 6165
73 Qt MQTT의 pus/sub 튜토리얼 file makersweb 2021.02.06 6144
72 QPA 플러그인과 HTML5 Backend file makersweb 2017.12.27 6136
71 2020년에 변경되는 Qt 오퍼 (Qt offering changes 2020) [2] j2doll 2020.01.31 6064
70 VTK 를 사용해서 강력한 시각화(3D, Plotting, Chart)Qt 응용프로그램 개발하기 file makersweb 2022.10.16 6013
69 웹기반 Qt Design Viewer [2] file makersweb 2019.10.23 5978
68 Qt5기반 독립 프로세스(out-of-process)로 동작하는 가상키보드(virtual keyboard) file makersweb 2019.02.24 5973
67 QOpenGLWidget 을 투명하게 적용 file makersweb 2020.02.05 5908
66 QThread 및 QMutex 예제 makersweb 2021.01.12 5908
65 Qbs에 대한 소개와 설치하는 방법 makersweb 2019.10.09 5899
64 최초의 Qt 6.0 스냅샷 제공 (First Qt 6.0 Snapshot Available) j2doll 2020.06.21 5895
63 Loader를 사용하여 동적으로 QML 로드 makersweb 2021.01.19 5874
62 MCU용 Qt에 대해서 makersweb 2019.08.22 5852
61 Q_D매크로와 d-pointer file makersweb 2019.05.07 5823