한국어
Qt
 

ShaderEffect을 이용하면 다양한 그래픽효과를 구현할 수 있다. 이를 이용해서 버튼의 클릭 효과를 구현해본다.
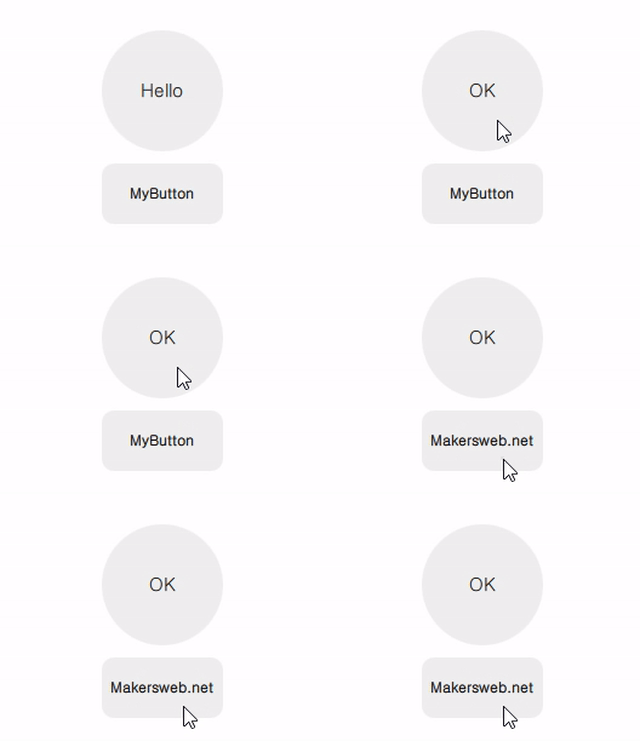
ShaderEffectQmlButton.gif


MyButton.qml

import QtQuick 2.2

Item{

    signal clicked()
    signal pressed()

    property alias radius: base.radius

    Rectangle{
        id: base

        radius: 10
        anchors.fill: parent
        color: "#10000000"
    }

    ShaderEffect {
        id: shaderEffect1
        opacity: 1
        anchors.fill: parent

        property variant source: effectSource

        ShaderEffectSource {
            id: effectSource
            sourceItem: base
            hideSource: true
        }

        property point normTouchPos
        property real widthToHeightRatio: height / width
        // animated uniform property
        property real spread: 0

        ParallelAnimation {
            id: touchStartAnimation
            UniformAnimator {
                uniform: "spread";
                target: shaderEffect1
                from: 0; to: 1
                duration: 300
                easing.type: Easing.InQuad
            }
            onStopped: {
                // animation stopped
                if(!touch.pressed){
                    if(shaderEffect1.spread != 0)
                        shaderEffect1.spread = 0
                }
            }
        }

        fragmentShader: "
            uniform sampler2D source;
            varying mediump vec2 qt_TexCoord0;
            uniform lowp float qt_Opacity;
            uniform mediump vec2 normTouchPos;
            uniform mediump float widthToHeightRatio;
            uniform mediump float spread;

            void main() {
                mediump float radius = (0.5 + abs(0.5 - normTouchPos.x)) * 1.0 * spread;
                mediump vec2 circleCenter =
                    normTouchPos + (vec2(0.5) - normTouchPos) * radius * 2.0;

                mediump float circleX = (qt_TexCoord0.x - circleCenter.x);
                mediump float circleY = (qt_TexCoord0.y - circleCenter.y) * widthToHeightRatio;

                highp vec4 color = texture2D(source, qt_TexCoord0);

                lowp vec4 tapOverlay =
                    color * step(circleX*circleX + circleY*circleY, radius*radius);
                gl_FragColor = (color + tapOverlay) * qt_Opacity;
            }
        "

        function touchStart(x, y) {
            normTouchPos = Qt.point(x / width, y / height)
            touchStartAnimation.start()
        }

        function touchStop() {
            touchStartAnimation.stop()
        }
    }

    MouseArea{
        id: touch
        anchors.fill: parent
        onPressed: {
            shaderEffect1.touchStop()
            shaderEffect1.touchStart(mouseX, mouseY)
        }
        onClicked: {
            parent.clicked()
            shaderEffect1.spread = 0
        }
        onExited: {
            shaderEffect1.spread = 0
        }
    }
}


다음은 구현된 MyButton을 사용하는 방법이다.

main.qml

import QtQuick 2.2
import QtQuick.Window 2.2
import QtQuick.Layouts 1.3

Window {
    visible: true
    width: 320
    height: 240
    title: qsTr("ShaderEffect Custom Button")

    ColumnLayout{
        anchors.centerIn: parent
        spacing: 10

        MyButton{
            width: 100
            height: 100
            radius: 50
            Layout.alignment: Qt.AlignHCenter

            Text {
                id: button0_text
                anchors.centerIn: parent
                text: qsTr("Hello")
                font.pixelSize: 15
            }

            onClicked: {
                if(button0_text.text == "Hello")
                    button0_text.text = "OK"
                else{
                    button0_text.text = "Hello"
                }
            }
        }

        MyButton{
            width: 100
            height: 50
            Layout.alignment: Qt.AlignHCenter

            Text {
                id: button1_text
                anchors.centerIn: parent
                text: qsTr("MyButton")
                font.bold: true
            }

            onClicked: {
                if(button1_text.text == "MyButton")
                    button1_text.text = "Makersweb.net"
                else{
                    button1_text.text = "MyButton"
                }
            }
        }
    }
}


번호 제목 글쓴이 날짜 조회 수
공지 Qt프로그래밍(QtQuick) Beginner를 위한 글 읽는 순서 운영자 2019.01.05 86072
119 Q_D매크로와 d-pointer file makersweb 2019.05.07 761
118 Qt기반의 오픈소스 프로젝트들 makersweb 2019.05.15 5449
117 QtSerialPort를 사용한 시리얼(Serial)통신 [3] makersweb 2019.05.21 11946
116 QML에서 멀티 스레드(multithreading) 프로그래밍 file makersweb 2019.05.25 2667
115 QtCreator Design으로 GUI만들기 (QML로 만드는 Hello World -2) [1] file makersweb 2019.05.26 14944
114 QtInstallerFramework로 온라인 설치프로그램(Online Installer)만드는 방법 [4] file makersweb 2019.05.28 6271
113 QML 강좌 - 동적 Listing (ListView) file makersweb 2019.06.01 10112
112 Qt Quick Controls 2사용 및 스타일 설정 file makersweb 2019.06.07 6271
111 Qt Creator에서 임베디드 장치로 deploy설정(Custom Process Step) file makersweb 2019.06.15 2204
110 QML, 이미지, 폰트등을 바이너리 리소스로 만들기 makersweb 2019.06.24 3522
109 Qt기반의 오픈소스 프로젝트들 - 2 운영자 2019.07.21 4016
108 [Qt] Google Play의 향후 요구 사항을 준수하는 방법 [2] j2doll 2019.07.29 976
107 [Qt News] Qt6 Git 개발 초기 단계 시작하기 j2doll 2019.08.02 2336
106 [Qt News] Qt 6 기술 비전 (Technical vision for Qt 6) [2] j2doll 2019.08.08 2120
105 열거형(enum)을 QML에서 사용하는 방법과 문자열(QString)로 얻기 makersweb 2019.08.20 3897
104 [Qt News] Qt for Python을 위한 기술 비전 j2doll 2019.08.20 1626
103 MCU용 Qt에 대해서 makersweb 2019.08.22 1921
102 QSocketNotifier로 파일 디스크립터의 활동감지 makersweb 2019.08.28 1733
101 C++로 구현된 모델을 QML의 ListView에서 참조 file makersweb 2019.09.07 4933
100 컨테이너에 적재된 객체를 편리하게 삭제하기 makersweb 2019.09.18 1670