한국어
Qt
 

ShaderEffect을 이용하면 다양한 그래픽효과를 구현할 수 있다. 이를 이용해서 버튼의 클릭 효과를 구현해본다.
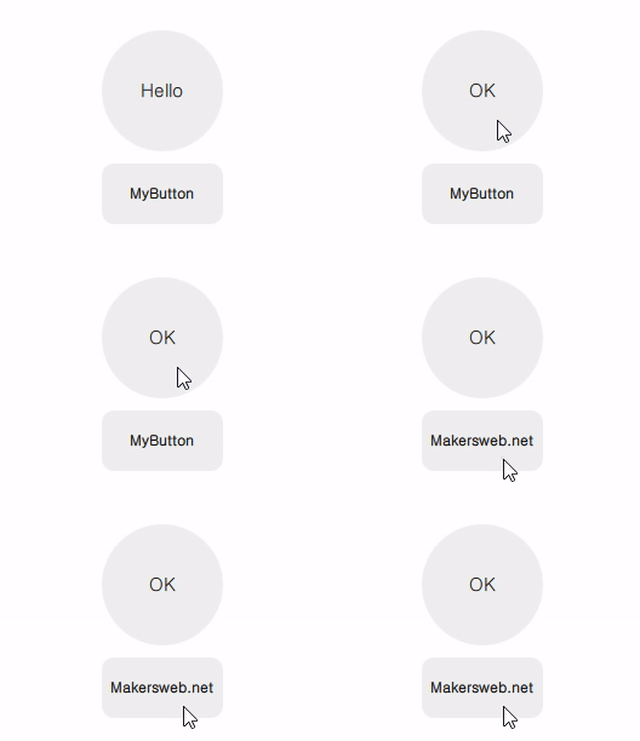
ShaderEffectQmlButton.gif


MyButton.qml

import QtQuick 2.2

Item{

    signal clicked()
    signal pressed()

    property alias radius: base.radius

    Rectangle{
        id: base

        radius: 10
        anchors.fill: parent
        color: "#10000000"
    }

    ShaderEffect {
        id: shaderEffect1
        opacity: 1
        anchors.fill: parent

        property variant source: effectSource

        ShaderEffectSource {
            id: effectSource
            sourceItem: base
            hideSource: true
        }

        property point normTouchPos
        property real widthToHeightRatio: height / width
        // animated uniform property
        property real spread: 0

        ParallelAnimation {
            id: touchStartAnimation
            UniformAnimator {
                uniform: "spread";
                target: shaderEffect1
                from: 0; to: 1
                duration: 300
                easing.type: Easing.InQuad
            }
            onStopped: {
                // animation stopped
                if(!touch.pressed){
                    if(shaderEffect1.spread != 0)
                        shaderEffect1.spread = 0
                }
            }
        }

        fragmentShader: "
            uniform sampler2D source;
            varying mediump vec2 qt_TexCoord0;
            uniform lowp float qt_Opacity;
            uniform mediump vec2 normTouchPos;
            uniform mediump float widthToHeightRatio;
            uniform mediump float spread;

            void main() {
                mediump float radius = (0.5 + abs(0.5 - normTouchPos.x)) * 1.0 * spread;
                mediump vec2 circleCenter =
                    normTouchPos + (vec2(0.5) - normTouchPos) * radius * 2.0;

                mediump float circleX = (qt_TexCoord0.x - circleCenter.x);
                mediump float circleY = (qt_TexCoord0.y - circleCenter.y) * widthToHeightRatio;

                highp vec4 color = texture2D(source, qt_TexCoord0);

                lowp vec4 tapOverlay =
                    color * step(circleX*circleX + circleY*circleY, radius*radius);
                gl_FragColor = (color + tapOverlay) * qt_Opacity;
            }
        "

        function touchStart(x, y) {
            normTouchPos = Qt.point(x / width, y / height)
            touchStartAnimation.start()
        }

        function touchStop() {
            touchStartAnimation.stop()
        }
    }

    MouseArea{
        id: touch
        anchors.fill: parent
        onPressed: {
            shaderEffect1.touchStop()
            shaderEffect1.touchStart(mouseX, mouseY)
        }
        onClicked: {
            parent.clicked()
            shaderEffect1.spread = 0
        }
        onExited: {
            shaderEffect1.spread = 0
        }
    }
}


다음은 구현된 MyButton을 사용하는 방법이다.

main.qml

import QtQuick 2.2
import QtQuick.Window 2.2
import QtQuick.Layouts 1.3

Window {
    visible: true
    width: 320
    height: 240
    title: qsTr("ShaderEffect Custom Button")

    ColumnLayout{
        anchors.centerIn: parent
        spacing: 10

        MyButton{
            width: 100
            height: 100
            radius: 50
            Layout.alignment: Qt.AlignHCenter

            Text {
                id: button0_text
                anchors.centerIn: parent
                text: qsTr("Hello")
                font.pixelSize: 15
            }

            onClicked: {
                if(button0_text.text == "Hello")
                    button0_text.text = "OK"
                else{
                    button0_text.text = "Hello"
                }
            }
        }

        MyButton{
            width: 100
            height: 50
            Layout.alignment: Qt.AlignHCenter

            Text {
                id: button1_text
                anchors.centerIn: parent
                text: qsTr("MyButton")
                font.bold: true
            }

            onClicked: {
                if(button1_text.text == "MyButton")
                    button1_text.text = "Makersweb.net"
                else{
                    button1_text.text = "MyButton"
                }
            }
        }
    }
}


번호 제목 글쓴이 날짜 조회 수
공지 Qt프로그래밍(QtQuick) Beginner를 위한 글 읽는 순서 운영자 2019.01.05 86196
79 C++로 구현된 모델을 QML의 ListView에서 참조 file makersweb 2019.09.07 4941
78 QSocketNotifier로 파일 디스크립터의 활동감지 makersweb 2019.08.28 1736
77 MCU용 Qt에 대해서 makersweb 2019.08.22 1923
76 [Qt News] Qt for Python을 위한 기술 비전 j2doll 2019.08.20 1627
75 열거형(enum)을 QML에서 사용하는 방법과 문자열(QString)로 얻기 makersweb 2019.08.20 3908
74 [Qt News] Qt 6 기술 비전 (Technical vision for Qt 6) [2] j2doll 2019.08.08 2123
73 [Qt News] Qt6 Git 개발 초기 단계 시작하기 j2doll 2019.08.02 2337
72 [Qt] Google Play의 향후 요구 사항을 준수하는 방법 [2] j2doll 2019.07.29 978
71 Qt기반의 오픈소스 프로젝트들 - 2 운영자 2019.07.21 4023
70 QML, 이미지, 폰트등을 바이너리 리소스로 만들기 makersweb 2019.06.24 3525
69 Qt Creator에서 임베디드 장치로 deploy설정(Custom Process Step) file makersweb 2019.06.15 2208
68 Qt Quick Controls 2사용 및 스타일 설정 file makersweb 2019.06.07 6283
67 QML 강좌 - 동적 Listing (ListView) file makersweb 2019.06.01 10125
66 QtInstallerFramework로 온라인 설치프로그램(Online Installer)만드는 방법 [4] file makersweb 2019.05.28 6277
65 QtCreator Design으로 GUI만들기 (QML로 만드는 Hello World -2) [1] file makersweb 2019.05.26 14984
64 QML에서 멀티 스레드(multithreading) 프로그래밍 file makersweb 2019.05.25 2673
63 QtSerialPort를 사용한 시리얼(Serial)통신 [3] makersweb 2019.05.21 11980
62 Qt기반의 오픈소스 프로젝트들 makersweb 2019.05.15 5462
61 Q_D매크로와 d-pointer file makersweb 2019.05.07 763
60 가상키보드(Qt Virtual Keyboard)를 사용하는 방법 [32] file makersweb 2019.05.03 221922