한국어
Qt
 

QML and Qt Quick OpacityMask 예제

makersweb 2023.01.26 21:03 조회 수 : 502

OpacityMask을 사용하면 소스 아이템을 다른 아이템으로 마스킹할 수 있다.

import QtQuick
import QtQuick.Window
import Qt5Compat.GraphicalEffects

Window {
    visible: true
    width: 500
    height: 400
    title: qsTr("QtQuick GraphicalEffects")

    Rectangle {
        id: area
        anchors.fill: parent
        color: "white"

        Rectangle {
            id: punchHole
            width: 400
            height: 300

            anchors.centerIn: parent

            color: "yellowgreen"

            layer.enabled: true
            layer.effect: OpacityMask{
                maskSource: Rectangle {
                    width: punchHole.width
                    height: punchHole.height
                    radius: 15
                }
            }

            /* Internel Content */
            Text {
                font.pixelSize: 20
                text: qsTr("This property allows the effect output pixels to be cached \n in order to improve the rendering performance.")
                anchors.centerIn: parent
                color: "black"
                horizontalAlignment: Text.AlignHCenter
            }
        }
    }
}
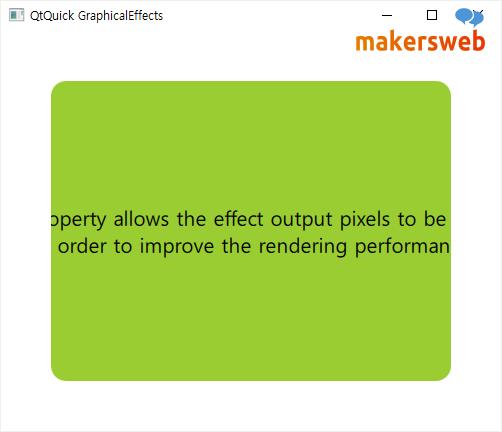
 

OpacityMask.png


다음과 같은 이미지를 넣어보자.

sky.jpg

단지 Image 아이템을 사용하고 source를 지정하면 된다.

import QtQuick
import QtQuick.Window
import Qt5Compat.GraphicalEffects

Window {
    visible: true
    width: 500
    height: 400
    title: qsTr("QtQuick GraphicalEffects")

    Rectangle {
        id: area
        anchors.fill: parent
        color: "white"

        Image {
            id: punchHole
            width: 400
            height: 300

            anchors.centerIn: parent

            source: "qrc:/sky.jpg"

            layer.enabled: true
            layer.effect: OpacityMask{
                maskSource: Rectangle {
                    width: punchHole.width
                    height: punchHole.height
                    radius: 15
                }
            }

            /* Internel Content */
            Text {
                font.pixelSize: 20
                text: qsTr("This property allows the effect output pixels to be cached \n in order to improve the rendering performance.")
                anchors.centerIn: parent
                color: "greenyellow"
                horizontalAlignment: Text.AlignHCenter
            }
        }
    }
}
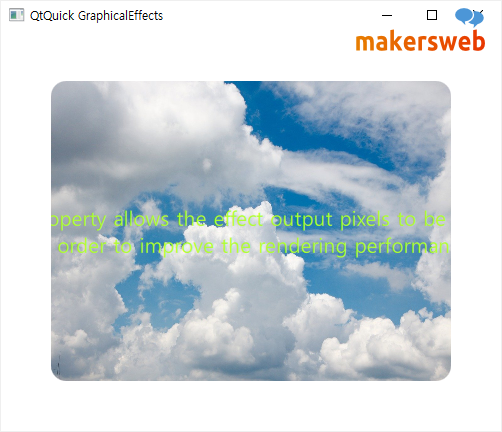
 

OpacityMask1.png

번호 제목 글쓴이 날짜 조회 수
공지 Qt프로그래밍(QtQuick) Beginner를 위한 글 읽는 순서 운영자 2019.01.05 85645
178 Qt Creator 에서 GitHub Copilot 사용하기 file makersweb 2024.04.13 35
177 QtQuick 애플리케이션에 Rive 애니메이션 통합 makersweb 2024.03.31 97
176 클라우드용 Qt file makersweb 2024.01.16 581
175 QRhi 에 대해서 file makersweb 2023.12.29 452
174 Android 애플리케이션 서명 구성 file makersweb 2023.12.17 418
173 QML의 사용자 정의 Image makersweb 2023.09.17 476
172 Base64로 인코딩된 파일을 복원 makersweb 2023.08.06 375
171 QML에서 D-Bus 통신 file makersweb 2023.03.15 593
170 Qt 하이브리드 애플리케이션(Hybrid App) 개발 file makersweb 2023.02.08 804
169 Widgets(C++) 기반의 기본 스타일을 Dark 테마 및 Material 디자인 스타일로 바꾸기 file makersweb 2023.01.28 1067
» OpacityMask 예제 file makersweb 2023.01.26 502
167 QProcess 예제 (프로그램 재시작) file makersweb 2023.01.25 711
166 하드디스크 드라이브 여유 공간 계산 file makersweb 2023.01.15 436
165 Qt Property(속성) 시스템 makersweb 2023.01.08 1647
164 VTK 를 사용해서 강력한 시각화(3D, Plotting, Chart)Qt 응용프로그램 개발하기 file makersweb 2022.10.16 1521
163 QProcess 보안 권고 리뷰 file makersweb 2022.09.18 547
162 QMake 프로젝트를 CMake 프로젝트로 변환 with qmake2cmake makersweb 2022.09.17 971
161 Qt Safe Renderer 개요 file makersweb 2022.09.08 500
160 clazy 로 13개의 시그널, 슬롯 오류 해결 makersweb 2022.08.23 543
159 Qt 스마트 포인터 (QSharedPointer, QScopedPointer, QPointer) makersweb 2022.08.18 1079