한국어
Qt
 

QML and Qt Quick OpacityMask 예제

makersweb 2023.01.26 21:03 조회 수 : 6521

OpacityMask을 사용하면 소스 아이템을 다른 아이템으로 마스킹할 수 있다.

import QtQuick
import QtQuick.Window
import Qt5Compat.GraphicalEffects

Window {
    visible: true
    width: 500
    height: 400
    title: qsTr("QtQuick GraphicalEffects")

    Rectangle {
        id: area
        anchors.fill: parent
        color: "white"

        Rectangle {
            id: punchHole
            width: 400
            height: 300

            anchors.centerIn: parent

            color: "yellowgreen"

            layer.enabled: true
            layer.effect: OpacityMask{
                maskSource: Rectangle {
                    width: punchHole.width
                    height: punchHole.height
                    radius: 15
                }
            }

            /* Internel Content */
            Text {
                font.pixelSize: 20
                text: qsTr("This property allows the effect output pixels to be cached \n in order to improve the rendering performance.")
                anchors.centerIn: parent
                color: "black"
                horizontalAlignment: Text.AlignHCenter
            }
        }
    }
}
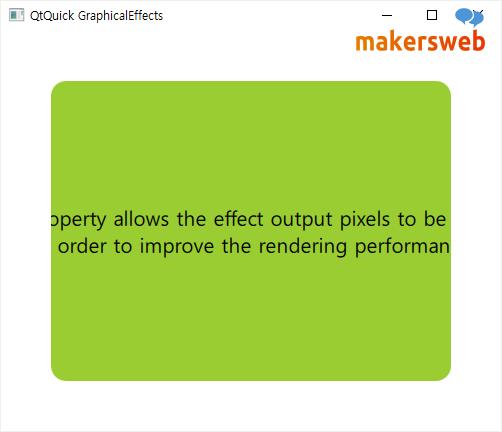
 

OpacityMask.png


다음과 같은 이미지를 넣어보자.

sky.jpg

단지 Image 아이템을 사용하고 source를 지정하면 된다.

import QtQuick
import QtQuick.Window
import Qt5Compat.GraphicalEffects

Window {
    visible: true
    width: 500
    height: 400
    title: qsTr("QtQuick GraphicalEffects")

    Rectangle {
        id: area
        anchors.fill: parent
        color: "white"

        Image {
            id: punchHole
            width: 400
            height: 300

            anchors.centerIn: parent

            source: "qrc:/sky.jpg"

            layer.enabled: true
            layer.effect: OpacityMask{
                maskSource: Rectangle {
                    width: punchHole.width
                    height: punchHole.height
                    radius: 15
                }
            }

            /* Internel Content */
            Text {
                font.pixelSize: 20
                text: qsTr("This property allows the effect output pixels to be cached \n in order to improve the rendering performance.")
                anchors.centerIn: parent
                color: "greenyellow"
                horizontalAlignment: Text.AlignHCenter
            }
        }
    }
}
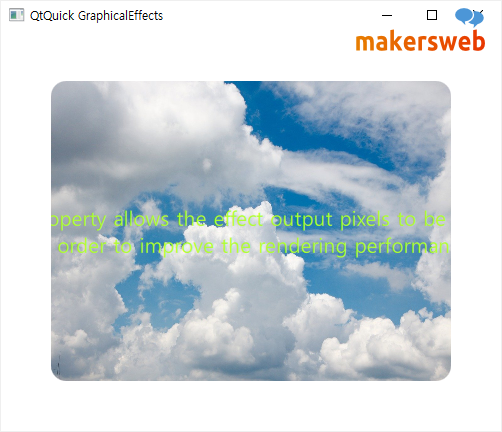
 

OpacityMask1.png

번호 제목 글쓴이 날짜 조회 수
공지 Qt프로그래밍(QtQuick) Beginner를 위한 글 읽는 순서 운영자 2019.01.05 116910
20 Qt의 스레드간 시그널 슬롯의 커넥션타입 [1] makersweb 2015.10.24 15302
19 Ubuntu Linux에서 Qt Creator 설치 file makersweb 2016.03.06 15399
18 Qt애플리케이션 객체(QCoreApplication, QGuiApplication, QApplication) 에 대해서 makersweb 2019.11.11 15424
17 Qt 응용프로그램 배포(windows) file makersweb 2018.10.10 15879
16 Qml 기본 컴포넌트 강좌 (1) file makersweb 2019.01.03 16098
15 QML과 QtQuick 모듈 개념과 기본 타입들 makersweb 2019.04.26 16828
14 Qt Installer Framework - 패키징, 설치프로그램 제작 file makersweb 2018.10.14 16945
13 Windows에서 라즈베리파이3용 Qt5.10.0 크로스컴파일 [20] file makersweb 2018.02.23 17677
12 Qt의 오픈소스 라이센스 소개 file makersweb 2019.12.15 17854
11 QtSerialPort를 사용한 시리얼(Serial)통신 [3] makersweb 2019.05.21 18072
10 Qml과 C++로 구현하는 GUI어플리케이션 file makersweb 2018.12.25 18367
9 Qt 프로그래밍의 시작 makersweb 2015.10.25 19436
8 QtCreator Design으로 GUI만들기 (QML로 만드는 Hello World -2) [1] file makersweb 2019.05.26 20374
7 초보자를 위한 첫번째 프로젝트 - QML로 만드는 Hello World file makersweb 2018.03.16 20996
6 QThread 소개 및 예제 makersweb 2019.12.25 26290
5 Qt의 시그널 슬롯 시스템 file makersweb 2015.10.20 29133
4 Windows에서 Qt 설치 따라하기 file makersweb 2019.10.14 36397
3 QString 문자열 다루기 예제 운영자 2019.01.26 48568
2 콘솔에서 사용자 입력받기 file makersweb 2020.03.22 56820
1 가상키보드(Qt Virtual Keyboard)를 사용하는 방법 [32] file makersweb 2019.05.03 237140